Operating Instructions
Business Card Sequencer Operating Instructions
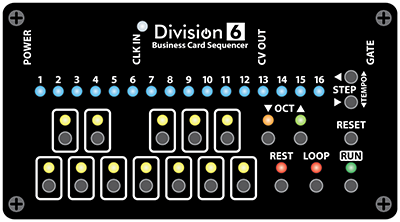
Connections, From Left to Right
Power In: 7-15VDC, tip positive (Don’t reverse it or it will get mad). Just find a voltage source on your synth somewhere. If the notes being played by the sequencer seem flat, the power supply you have chosen may be dropping too much under load. If you can’t or don’t want to use your synth to power the sequencer, you can use a 9V Battery or AC power supply.
Clock In: 0-5V is ideal, but going outside that range won’t hurt it. Step will advance on rising edge.
CV Out: 1 volt/octave, C=1V/2V/3V. Connect to the CV in on your oscillator (or filter or whatever)
Gate Out: On=+5V. Plug this into your VCA, EG, etc. Gate timing follows the clock when the sequencer is running, buttons when in Ready mode, and stays on while programming.
Operation
Push Run to start playing a sequence. The true green Run LED will light to tell you that you are in Run mode. Push it again to Pause. The sequencer steps can be programmed while paused.
Push reset to stop the sequence, go to step 1, and enter Ready mode. The blue step LED will blink to let you know that you are in Ready mode. This means that when you press Run again, the sequencer will play step 1 on the next clock pulse instead of skipping it and going to step 2.
If you want to start on a different step, you can use the step left and right buttons to pick a different one.
While in Ready mode, you can use the note buttons to manually play tunes without messing up the sequence you have stored in memory. Gate timing will follow your button presses.
Programming is done while the step LED is steady (not Ready mode) and the sequencer is not running. You can enter Programming mode by pressing Reset a second time, or pausing a sequence with the Run button. Use the step left/right buttons to pick which step you want to program, then press the note you want that step to play. The new note is automatically stored in non-volatile memory.
Remember about the step LED:
- Blinky = Ready Mode = Will start on selected step = Can play keyboard live
- Steady = Programming = Any notes you push will get saved in that step
The sequencer keyboard covers 3 octaves, so you can use the octave up/down buttons to transpose the keyboard up and down. The green and orange LEDs will tell you which octave the keyboard is currently set to.
In addition to standard notes, you can also program a Rest or a Loop command into a step. A Rest step holds the previous note and doesn’t fire the gate. Loop makes the sequencer go back to step 1. You can use this to create any length sequence you want. For example, if you only want steps 1-13 in your sequence, you would make step 14 a Loop step.
Starting with firmware version 1.1, the sequencer operates with a built-in clock from power-up until it receives its first external clock pulse. The internal clock rate can be adjusted up and down while the sequencer is running using the step buttons. Once the unit has switched to external clock mode, the internal clock can be restored by holding down the reset button for about 2 seconds (soft reset) or removing/restoring power to the unit.
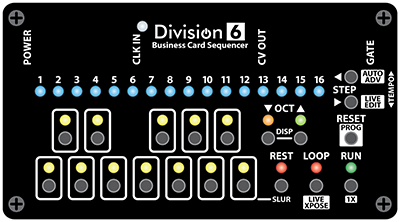
Version 2
Instructions beyond this point refer to new features found in version 2 of the sequencer firmware. You can tell if you have v2 by watching the sequencer’s boot light show; after it lights each row of LEDs sequentially, it will light the step 2 LED then the step 10 LED (for v2.0) before the clock LED starts blinking. If it doesn’t light any LEDs during this time then you have v1 firmware.
Song/Sequence selection mode
Press and release both the OCTAVE UP and OCTAVE DOWN buttons at the same time. This changes the note key display to SONG/SEQUENCE SELECT mode. Pressing this button combination again takes you back to the normal note select mode.
Selecting a Sequence
If the entire row of white keys is lit while displaying SONG/SEQUENCE SELECT, you are in SEQUENCE mode. The selected sequence will play to the end then loop back to the beginning.

The sequencer has 7 sequence memories available for you to choose from. The steady LED indicates the currently selected sequence. To select a different sequence, press the white note key corresponding to the sequence you want to select. If the sequencer is running, the newly-selected sequence LED will flash until the sequencer reaches the end of the current sequence (or on the next clock; see CHANGE ON CLOCK mode), then it will switch to the new sequence.
Another way to select a sequence, even while the display is in another mode, is to hold down the PROG/RESET button then press the desired sequence button. The display will automatically change to SONG/SEQUENCE SELECT mode.
Selecting a Song
If the entire row of black keys is lit while displaying SONG/SEQUENCE SELECT, you are in SONG mode.

The sequencer has 5 song memories available, which can be used to string together up to 16 sequences in any order. Each song step contains one sequence. When running and the current sequence has completed, the sequencer will advance to the next song step and play the sequence it contains.
To select a song (and switch to SONG mode), press the black not key that corresponds to the song you want to play. If the sequencer is running, the newly-selected song LED will flash until the sequencer reaches the end of all the sequences in the current song (or on the next clock; see CHANGE ON CLOCK mode), then it will switch to the new song.
Another way to select a song, even while the display is in another mode, is to hold down the PROG/RESET button then press the desired song button. The display will automatically change to SONG/SEQUENCE SELECT mode.
Programming a Sequence
Programming a sequence hasn’t changed much since v1. Whichever sequence you have selected is the one you are modifying when you enter PROGRAM mode (steady STEP LED) (See above for basics). There are, however, a few additional options…
SLUR
Rests still work like in v1; when the sequencer gets to a REST step, it keeps the CV OUT the same and doesn’t fire the gate. You can also make a step a SLUR, where it changes the CV OUT to a new note but still doesn’t fire the gate.
To program a SLUR on a step, hold down the REST button, then press the desired NOTE button for that step. Both the REST and NOTE LEDs will light.
Gate Timing
When you first program a note into a step, the gate timing is set to the default mode where the gate follows the timing of the clock. V2 gives you 16 different gate timings to choose from:
- 1- Normal/Follow
- 2-1/4
- 3- 1/3
- 4- 1/2
- 5- 2/3
- 6- 3/4
- 7- Full (almost- gate will still drop briefly before next step)
- 8- Second 1/4
- 9- Third 1/4
- 10- Fourth 1/4
- 11- Second 1/3
- 12- Third 1/3
- 13- Second 1/2
- 14- Double (ratchet!)
- 15- Triple (ratchet!)
- 16- Quadruple (ratchet!)
All the gate timing modes besides 1 work by dividing up the incoming clock signal then calculating the needed timings. This works best with steady clocks. If you are wanting to make drastic rapid changes to the incoming clock rate then you will probably get the best gate timing results from using mode 1.
To choose one of the above gate timings while programming a step, press the desired note multiple times. Every time you press the same note, the next gate timing will be selected. The current timing number will be shown briefly on the STEP LEDs every time a new one is selected. The GATE OUT will also do its best to demo the current gate timing for you.
Programming a Song
Each step in a song contains a sequence. To program sequences into song steps, first make sure the keyboard display is in SONG/SEQUENCE SELECT mode (press OCTAVE UP and OCTAVE DOWN at the same time if it’s not). Press one of the black keys to select the song you want to work on.
Press PROG/RESET until the STEP LED is steady; you are now in program mode.
Press the white key that corresponds to the sequence you want to store in the current song step. The white key LED corresponding to the selected step will light.
Press the STEP UP to advance to the next song step (or STEP DOWN to go back) and select the desired sequence for that step. Continue to program sequences into steps until they’re all programmed.
If you don’t want to use all 16 steps in your song, you can use the LOOP button to make the step after the end of your song a LOOP step. For example, if you only want 4 sequences to play in your song, program a LOOP into step 5. When running, the sequencer will bounce off of step 5 and loop back to the first step of the sequence programmed into the first step of your song.
Copying a Song or Sequence
When programming songs or sequences, sometimes you might want to copy an existing one so you can modify it instead of starting over from scratch for each one. To do this, first make sure the keyboard display is in SONG/SEQUENCE SELECT mode. Press and hold the song or sequence you want to copy from, then press and hold the song or sequence you want to copy to. Hold the two buttons for about 1 second; the note LEDs will flash to let you know when the copy has been performed.
- The copy always goes from the FIRST -> SECOND button you press!
- You can’t copy songs to sequences or sequences to songs
Clearing a Song or Sequence
All the songs and sequences in the sequencer always exist, so generally if you want to wipe out an existing song or sequence you can just modify them or program something new over the top of them. If you do want to “clear” a memory, however, you can. Clearing a sequence sets all the steps to the lowest note. Clearing a song sets all the steps to sequence 1.
To do this, first make sure the keyboard display is in SONG/SEQUENCE SELECT mode. Press and hold the song or sequence you want to clear, then press and hold the RESET button. Hold the buttons for about 1 second; the note LEDs will flash to let you know that the song or sequence has been cleared.
Internal Clock
The internal clock works pretty much like before (see v1 section), but more speed choices have been added and they have been more heavily concentrated in the “useful” range. Also, we know what actual BPMs the speeds are now!
- 10 BPM
- 25 BPM
- 50 BPM
- 70 BPM
- 80 BPM
- 90 BPM
- 100 BPM
- 110 BPM
- 120 BPM
- 130 BPM
- 140 BPM
- 150 BPM
- 160 BPM
- 170 BPM
- 180 BPM
- 190 BPM
- 200 BPM
- 210 BPM
- 220 BPM
- 230 BPM
- 240 BPM
- 250 BPM
- 275 BPM
- 300 BPM
- 400 BPM
- 500 BPM
- 600 BPM
- 700 BPM
- 1000 BPM
- 2000 BPM
- 4000 BPM
- 8000 BPM
The internal clock uses the PIC microcontroller’s built-in oscillator for timing, so it may not be super-accurate. We still recommend using an external clock if you’re doing something that is timing-critical.
PROG/RESET Button
The RESET button now has an additional function (or rather a bunch of them). It is used in conjunction with some of the other buttons on the sequencer to enable and disable various modes (as indicated by the text in the white rectangles for more common functions).
AUTO ADVANCE
When this mode is enabled and you are programming a sequence, once you enter a NOTE or REST or LOOP into a step, the sequencer will automatically advance to the next step. This lets you just play your sequence into the sequencer without having to press STEP UP in between each step, making initial programming of a sequence easier.
Note: Gate timing selection and SLURs are not available in AUTO ADVANCE mode. You can enter in the basic structure of your sequence then go back in normal PROGRAM mode and tweak the timings, etc.
To enable or disable AUTO ADVANCE mode, hold down the PROG/RESET button and tap the STEP DOWN/AUTO ADV button. The STEP 16 LED will blink twice when enabled and flicker dimly when disabled.
Once enabled, AUTO ADVANCE mode stays on until the next time you put the sequencer in RUN mode, at which time it will disable itself. That is unless you enable…
PERSISTENT AUTO ADVANCE MODE
To ensure that AUTO ADVANCE mode stays turned on until you manually turn it off (even if you press RUN), enable PERSISTENT AUTO ADVANCE MODE by pressing and holding PROG/RESET, pressing STEP DOWN/AUTO ADV, and holding both buttons for 1 second. The STEP 16 LED will blink twice dimly when enabled and flicker once dimly when disabled.
LIVE TRANSPOSE
When this mode is enabled and the sequencer is running (and not displaying SONG/SEQUENCE SELECT), You can use the note keys to temporarily transpose your entire sequence up or down.
Hold down the PROG/RESET button, then tap the LOOP/LIVE XPOSE button to cycle through the different LIVE TRANSPOSE modes:
- On, root key at top of keyboard
- On, root key in center of keyboard
- On, root key at bottom of keyboard
- Off
The LOOP LED will flash twice for each ON mode, along with the selected root key. The LOOP LED will flicker dimly when LIVE TRANSPOSE mode has been turned off.
While running in this mode, instead of the usual current-note display, the NOTE and OCTAVE LEDs will display the status of your transposing:
- Steady NOTE LED = root key
- Blinking NOTE LED = currently selected transpose amount
- Dim/flickering NOTE LED = all the notes in between
If you press the root key (indicated by a steady NOTE LED), the transpose amount will be set to 0 and your sequence will play just as it’s programmed.
If you press a NOTE key above the root key, then the CV OUT will be transposed up by however many steps the key you pressed is above the root key. For example, if the root key is the F in the middle of the keyboard and you press the G key, then your sequence will be temporarily transposed up 1 step (2 semitones). The LED corresponding to the key you selected will blink to let you know at a glance how much you are transposing and in which direction. All the LEDs in between the root key and your selected key will flicker dimly.
If you press a NOTE key that is below the root key, then the CV OUT will be transposed down by however many steps the key you pressed is below the root key.
If you want to transpose farther than what is currently displayed on the keyboard, you can use the OCTAVE UP and OCTAVE DOWN buttons to shift the keyboard octave. Select the octave you want, then press the key for the amount you want to transpose. You can also instantly jump to a transpose key in another octave (one up or one down) by holding one of the OCTAVE buttons and pressing the desired key.
Note: You can’t transpose past the range of the CV output. For example, if you have a note in your sequence that is the lowest C, then you try to transpose down from there, the output isn’t going to get any lower. For maximum transposeability we recommend programming your sequences in the middle octaves.
If you use the RUN button to pause the sequencer then start it again, whatever transpose amount you set will be retained. If you press RESET to go back to the beginning of the sequence then the transpose amount will be cleared.
There are a couple other buttons that work in LIVE TRANSPOSE mode that might come in handy during a live performance:
- REST: Makes the next step a REST (one time only)
- LOOP: Loops back to the beginning of the song or sequence on the next step (one time only)
LIVE EDIT
Normally when a sequence is running, the NOTE buttons don’t do anything. With LIVE EDIT mode enabled, you can use the NOTE buttons to program your sequence on the fly.
To enable or disable LIVE EDIT mode, hold PROG/RESET down and tap the STEP UP button. The STEP 15 LED will blink twice for enabled and flicker dimly for disabled.
When the sequencer is running, pressing a NOTE button will program that note into the current step. You can also program a REST or a LOOP during live editing.
Note: the changes you make using LIVE EDIT don’t actually get written to the sequencer’s non-volatile memory until you pause/stop the sequencer. Don’t disconnect power while it’s running or you’ll lose your changes! (This does not apply to using the normal PROGRAM mode; changes are saved immediately.)
1X
When 1X mode is enabled, the sequencer will play through the current song or sequence then go into standby mode.
To enable 1X mode, hold PROG/RESET down and tap the RUN button. The RUN LED will blink twice for enabled and flicker dimly for disabled.
CHANGE ON CLOCK mode
Normally if the sequencer is running and you select a new song or sequence to play, it waits until the current one has completed before switching to the new one. You can change this so that the song or sequence is switched on the next clock by enabling CHANGE ON CLOCK mode.
To enable this mode, press and hold PROG/RESET, then STEP UP, then hold both buttons for 1 second. The STEP 15 LED will blink twice for enabled and flicker dimly for disabled.
Troubleshooting
CV OUT voltage wrong or sequencer has 5 octaves instead of 3
v2 sequencer chips auto-detect whether they are installed in a Business Card Sequencer or a Dual Mini Sequencer, but sometimes this doesn’t work right. The BC Sequencer should let you select between 3 octaves, but if it appears that you have 5 instead of 3, then the chip thinks that it’s in a DMS. Fortunately it’s easy to override the auto-detection feature and hard-set it to Business Card Sequencer mode:
- Reboot the sequencer by power-cycling or holding down the RESET button for several seconds
- While the sequencer is doing its boot light show, hold down the E and F buttons
- The LEDs will flicker at the end of the light show and it should now be a Business Card Sequencer forever
